How to Use Digital Scrapbook Templates
Do you want to learn how to create a digital scrapbook page the easy way?
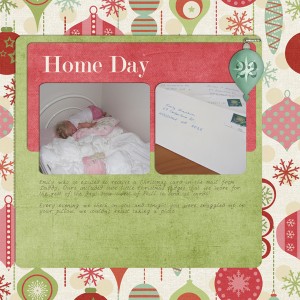
Today I'll share with you how I created this layout from a digital template.

For this layout I've used: Simple Template Album Template 3; Peace on Earth by Flergs and Eva Kipler available at Scrapbookgraphics; Happy Hollydays and Happy Hollydays Add on Paper Pack by Karen Lewis Designz; Fonts: Melissa's Hand
Play Along
You can see me create the page in the the video below. I've also included the steps I used to help you as you create your own page.
As you are watching you can pause the video and head over to complete each step with your own layout (need a template? You can grab a freebie when you join my mailing list). Need freebies? Here's some gorgeous ones from Flergs.
You can watch the video in full screen mode: Click to start playing the video - then you can click on the far right button (4 arrows outwards![]() ). See them in all their glory and actually be able to read the text and see what I am doing.
). See them in all their glory and actually be able to read the text and see what I am doing.
Step 1 - Select your Photos
If generally suggest selecting your photos first, then looking through your stash of templates to find one that has the number of photo spots you need.
Step 2 - Select your Template
I browsed through my templates to find one with the number of photo spots I need. Today I used Template 3 from my Simple Template Album set.
I'll have some tips for organising templates in an upcoming post.
Step 2 - Save your Work
Save your template as a new name, so you'll be able to use the original template again later.
Be sure to use File - Save As to save your file as a new name - that way you can reuse the template later.
Save your work as a PSD file – eg20110101 Emily 1st birthday.psd.Photoshop Documents (PSD files) retain the layers and can be edited later.
You'll need to save your work regularly. Go to File - Save to save your work (or press Ctrl+S or Cmd+S on a Mac).
Step 3 – Place and Clip your photos
Place your photos into your layout:
- Click with your move tool on the photo spot
- Click File - Place then browse to find the photo you want to add to your layout.
- Clip your photo to the photo spot by pressing Ctrl+G (or Cmd+G on a Mac)
- Now you can move and resize your photos to your heart's content!
This process creates a smart object so that your image can be resized multiple times without losing quality. Great for those of use who love to come back and change photo sizes later!
This will mean your printed layouts will always look great!
Watch the video for for tips on placing files, constraining proportions, resizing photo spots and more!
Step 4 – Add your Papers
Add papers to complement your photos using the File - Place... command.
Then clip them to your template layers by using the Ctrl+G (Cmd+G on a Mac) shortcut.
Step 5 – Add your Journalling
Use the text tool to include your journalling.
Step 6 – Add Embellishments
You can clip papers to embellishment spots or place any embellishment you like on your layout using the Place command.
Click the eye icon hide the layers you don't need.
Step 6 – Add Shadows
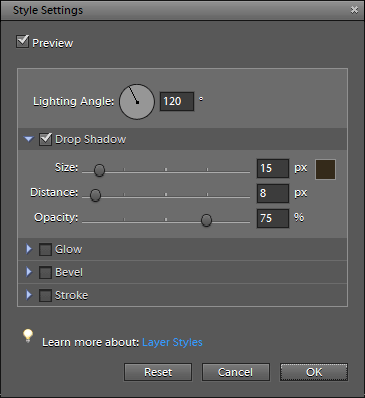
You can add your own drop shadows by clicking on the Layer menu then Layer Styles - Style settings. In the video I show you how to copy the shadows included in your template.

You could also use a purchased shadow style.
Step 7 - Admire your work

Well done! You've now finished your first layout! Be sure to save your work.
Questions?
I'd love to hear your questions in the comments of this post, what do you want to know about Photoshop Elements?
How to Use Digital Scrapbook Templates
Source: https://digitalscrapbookinghq.com/digital-scrapbooking-primer-using-a-template/

0 Response to "How to Use Digital Scrapbook Templates"
Post a Comment